Showing posts with label Coffret D'or. Show all posts

Sunday, 22 January 2012

Konad: NYC Royal Foil over Sally Hansen Secrets Frost

Here's the manicure I mentioned the other day, my first Konad success! Only because it wasn't a Konad stamper.. it was the As Seen On TV Salon Express stamper from their kit sold at Rite Aid. And ok it isn't actually my first success, it's my second..but it's the first complete manicure with this kit, my first try that came out well was just some test nails. Since the Konad stamper just doesn't seem to work for me, I'm willing to trade it and the nail scraper to a new home, since some people have much more luck with it than others (like Erika and I.) I really like how it came out, I love the chrome purple/silver glitter combo. I used it in a past manicure as well. The leopard design is from Konad plate m57. As the title states, I used the NYC Foil Nail Enamel in Royal Foil that Erika gave me over Sally Hansen Teflon Tuff Secrets Frost, and I topped it off with Coffret D'or gel look topcoat. I was so proud of myself, nail stamping is actually lots of fun when it actually works!
Konad: NYC Royal Foil over Sally Hansen Secrets Frost by KitaRei
Konad: NYC Royal Foil over Sally Hansen Secrets Frost, a photo by KitaRei on Flickr.

Royal Foil looks awfully like Sally Hansen Sapphire Chrome (which is actually purple, so I have no idea why they named it that.) This could be a dupe for it, but I'm not sure if they came out at the same time.. this is a vintage NYC polish so it's very possible. I should whip them out and compare them :)

Sunday, 25 December 2011

First 3D manicure- Xmas Snowflakes

Merry Christmas everyone! Here is my first 3D manicure that I've been waiting to post.

The base color is China Glaze Phat Santa, the stripes are Sally Hansen ColorFast Lucky Creme, a vintage Wet N Wild in White Gold, Crayon holographic gold liner, 3D acrylic snowflakes that I made, and topped off with Coffret D'or gel topcoat. Ignore the cracks in the topcoat on one nail. ^^;;

It was really easy to make the snowflakes, much easier than I thought! I just dipped the brush in acrylic liquid, then the acrylic powder, then brushed it in the mold, popped it out after about a minute, and done!

What do you think?
Happy Holidays everyone!

Tuesday, 14 June 2011

Gel look frosty half moon mani

Good afternoon everyone :)
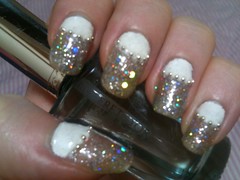
I came up with the idea for this manicure on a whim after I swatched the Tina Rose glitter polish and really wanted to do something with it. I took this one slightly blurry on purpose to show the sparkle. It is so hot now, and I thought I'd make a cool look to help beat the heat ;)
The main color is Tina Rose #316. This is a great glitter polish! It is almost as good as the SUPER sparkly/holographic one that I got back in Japan in 2009 (which is currently missing :( I really need to find it, I would LOVE to swatch it and do a comparison with this one!)
It has both big and fine glitter mixed in, and though not as good as the one I mentioned above I would definitely say this one is the runner up. They also have a gold version of this.. I may go and get it..
.Tina Rose #316 Swatch

The white is New York Color French white tip. I used silver bullion to line the half moon circles, and I covered it with several layers of Coffret D'or gel look topcoat. I found a MUCH better gel topcoat (much better gel look with MANY less coats, even only one is good!) which I will swatch and compare to this one later.
Gel look frosty half moon mani


Gel look frosty half moon mani, a photo by KitaRei on Flickr.

What do you think? :)

Saturday, 11 June 2011

Super light gradient nails

Super light gradient nails by KitaRei
Super light gradient nails, a photo by KitaRei on Flickr.

This is actually the second person's nails I've done, the first I couldn't really get a good picture (I have one, but it is super dark.)

Yoshi's co-worker wanted her nails done, but since the companies are really strict here she was really limited on what she could choose. Believe it or not, I used 3 polish colors here and one fine glitter!

The base color (yes there actually is one ^^;;) is Hanagoyomi Cape Jasmine (kuchinashi.) I then painted the tips of her nails with two coats of NYC Nail Glossies #213, a gorgeous though super sheer pearly golden pink. Then, to blend the two colors together, I applied Sally Hanson Diamond Strength in Diamonds on the border of the colors and blended before they dried. To add a splash of color and accentuate the gradient, I sprinkled a dark pink fine glitter on the tips, and coated it with Coffret D'or gel topcoat.

Tuesday, 31 May 2011

Turquoise glitter and stone pedi

It was time to change the polish on my toes, and I had just gotten this really pretty turquoise nail polish, so why not?

The turquoise polish is by AC. I'll swatch it on my nails another time.. as soon as I think of a good manicure idea that uses turquoise glitter ;) It's very pretty, the polish base is a clear turquoise color with big and small glitter pieces. It is actually much shinier in person, but my camera didn't catch that too well.

Next, I applied gel topcoat to give the stones a good base to stick to. Then I used a gold jewelry jump ring to frame the center hot pink stone, and coated it with gel polish to make give it the illusion that it is bigger. Then I placed two light pink stones on either side.

This one is simple, but elegant :)

Thursday, 26 May 2011

Diagonal & reversed edge, holographic and "bullion" mani

For today's manicure I did get a little inspiration from one of my Japanese manicure magazines, the basic design, but to mix it up I changed the colors, reversed the patterns on two nails, and re-arranged the placements of the gold balls.
OPI Tickle My France-y swatch:
OPI Tickle My France-y Swatch

I called the gold balls bullion in the title, because well thats what they're called here, and well, I don't know what else to call them.. they aren't beads.
Diagonal & reversed edge, holographic and "bullion" mani by KitaRei
Diagonal & reversed edge, holographic and "bullion" mani, a photo by KitaRei on Flickr.
After my base coat I applied the base color, OPI Tickle My France-y. Its a great color, a mauve-y nude, which works so well with other pink and purple polishes. I then freehanded (let me tell you how hard that is.. and I did mess up and fix it a few times) the diagonal hot pink (no name) polish edges, purporsely reversing the sizes,(look at index and middle finger, for example, the bottom corner on the index finger is bigger, while the top corner on the middle finger is bigger) and I reversed the pattern on the thumb and pinkie fingers.

Next, I took a nail art brush and painted stripes, reversing the placement on the nails of course ;) of Sally Hansen Teflon Tuff Nail Color in Secrets Frost. I LOVE this holographic polish.. I need more!! After that, I placed the gold bullion in alternating places on the nail (seeing a pattern here? ^_~.) The spacing/placement on the nails is on purpose, no gold beads are missing/placed incorrectly. Finally I topped it off with Coffret D'or gel topcoat.

I actually found a much better gel topcoat, will blog about that one later!

Sunday, 22 May 2011

Brown and Gold Studded Mani

Hi everyone!
How was your weekend? I'm back with a Street Wear swatch, and a new mani!

Sorry about the bad picture.. I just couldn't get a good one this time. This is something I came up with a little inspiration from my Japanese manicure book, and my first experiment with 3D nail parts. They used blue polish, jewels, and they didn't do the all glitter on two fingers look (I had to change it somehow!) but I wound up liking this look much more.

The base color is Street Wear Forbidden that I got from Erika last year for my birthday. I've been dying to use this gorgeous color in a manicure for a while, but I had to wait for the right idea. This color is so amazing, it is a reddish brown with gold shimmer in it (though it's hard to see in the picture.)

Street Wear Forbidden Swatch

Then I did a graidient look with the gold glitter from my Beauty World Champagne Nail Cocktail kit, then used my dot art tool to dot two different sizes of Beauty World bronze dots, and finally I added gold colored studs on the ends. I sealed it off with Coffret D'or gel topcoat.

Brown and Gold Studded Mani by KitaRei
Brown and Gold Studded Mani, a photo by KitaRei on Flickr.

What do you think?

Monday, 9 May 2011

Flower Glitter French Manicure

Hi everyone,
For this week I did a two-part manicure. I had done a similar manicure to this a few times last year before I started blogging, and I never took a picture of it, so this is kind of like part one. I wanted to take a picture of the original look before I added the rest of the flowers. I think the simpler look is more classy, but as I have worn it before I wanted to spice it up.

First I'll start with the swatch. Hanagoyomi is a cute line of Japanese nail polish that mimics the colors of flowers. It also comes in cute little heart shaped bottles. This color is called Cape Jasmine, or "kuchinashi." It is a pinkish tinted nude shade, great for French manicures. This brand also makes a birth flower line. I need to find more of these.
Hanagoyomi Cape Jasmine swatch
Cape Jasmine photo courtesy of gardenguides.com
On to part one. The main color is Hanagoyomi Cape Jasmine. I painted the tips with Hanagoyomi Cattleya (type of orchid.) The big purple flowers are stickers, and I painted the white flowers I used New York Color French White Tip and a no-name Japanese yellow polish for nail designs. I finished the look with Coffret D'or gel topcoat.
Basic floral glitter french mani
This is part two. I painted the smaller purple flowers with Maybelline forever strong metallics + Iron Punked Out Purple.
Flower Glitter French Manicure by KitaRei

Which look do you like better?

Friday, 6 May 2011

Spring pink pedi

Yay, it's finally starting to feel like spring!!
Spring pink pedi by KitaRei
Spring pink pedi, a photo by KitaRei on Flickr.

I've been avoiding pedicures for a looong time, mostly due to the fact that I haven't had a salon pedicure since December and because of that, my feet were looking pretty scary.
I had some time today and decided to give one a shot myself.

The main color is a no-name hot pink pearly polish. For the big toe I painted the upper corners with NYC Polyester Pink Creme, put Broadway Nail Art stickers on the border of the two colors, and topped it off with Coffret D'or gel topcoat.

Tuesday, 3 May 2011

Spring Mani and Iwashimizu Shrine

This week I did a spring mani. I love this color, it reminds me of fruit juice, and the gold glitter really works well with it. Today my friends and I went to Iwashimizu Shrine in Kyoto, and since the temple is an orangey-red color I thought this would make a great shot.
Look, Yoshi made the picture!

This look is inspired from a look in my nail art book. The original has 4 pinky-orange nails with the ring finger being a pearly yellow. As I didn't have a pearly yellow, I made all nails a citrus orange and painted gold sparkles over the entire ring finger nail.
I also like how this manicure has gold glitter lining the top and bottom of the nail, not just the bottom.

For the main color I used Vacances Power Stone Magic #8 Carnelian (the idea of each of the colors in this line is to look like power stones, as power stones are trendy here now.) This line is really cute, and comes with a booklet of nail designs, but the only problem is the bottles are TINY. Here are some of the designs and colors from the booklet:

For the dots, I used Diamond Nail Homei, which is white with glitter. I DO NOT recommend this brand. It is a Taiwan based brand (not Japanese.) I bought it thinking it was pretty, and it is horrible. When you try to polish your nails, it does not cover evenly, and it just goops and looks horrible. I can only use this for designs.


The border glitter is Vissee, and the chunky glitter over the ring finger is from my Beauty World nail cocktail nail kit. I finished it off with Coffret D'or gel topcoat.

Wednesday, 27 April 2011

It's Wednesday, and I'm wearing pink!

Hi everyone, happy Wednesday!! I actually have an older mani and swatch to post, but I thought I'd post this one first since it's Wednesday, and well, I so happen to be wearing pink!


First the good news: The Japanese school that I will be attending isn't just a Japanese school, it isn't even just a language school. They offer all sorts of programs in the arts, which just so happens to include-are you ready for it-classes for Japanese manicures! The best part is- the regular class is about $10, and one class per month FREE for students! What does this all mean? Well I have a chance to become professional in Japanese nail art, SQUEE!

Ok so back to the manicure. Yoshi just got me a book on Japanese manicure tips and tricks (still learning some of the Japanese terms yet for this stuff) and I saw a relatively easy tutorial for marbling (well, much easier than water marbling anyway, and less messy) so I decided to try it.

First, here's a swatch of NYC Long Wearing Polyester Pink Creme #108A. Just like the other NYC polishes, it took four coats to get an even color, but it is a nice shade:

NYC Polyester Pink Creme #108A Swatch

Now the mani. This is my first attempt at a marble manicure, so forgive me if it isn't super-awesome :p
First Marble Mani by KitaRei
First Marble Mani, a photo by KitaRei on Flickr.
For the base color I used NYC Long Wearing Polyester Pink Creme #108A. I used Visee Glamorous Sparkle #10(I still can't find my fine brush, so I used a toothpick..) for the glitter half moons on my nails. Half moons are really big here. For the actual marbling, I used NYC Long Wearing French White Tip #134 and Revlon Limited Edition Diamonds Are Forever. I topped it off with Coffret D'or gel topcoat.

Thanks for reading!


Tuesday, 22 February 2011

Week 2 in recovery (Renee)

While at home recovering, (and let me tell you, it gets old FAST) I decided to give myself another manicure (it's amazing how nail polish chips off, even when you aren't being super active!). Disclaimer: any resemblance of this manicure to anyone's, living or dead, is strictly coincidental ^_~
It's my first time doing such an intricate design, but since nail design is HUGE in Japan, I decided to try it for myself (trust me, it gets SUPER crazy here, including 3D plastic objects and other things). My design is much tamer, though I have to take a pic of the nails I bought on here sometime.

I started with a Jordana salon formula in frosted pink that I had totally forgotten about. What's nice about this polish is it contains the powder of actual pearls (or so the label states) which gives it a natural and pretty pearly sheen.
Next, I used Maybelline Express Finish Glitters (remember those?) in Mandarin Mars to put on the tips in a triangle twist on the french manicure design. I have some more Maybelline Express colors, I just need that polish reviver and I'll be busting them out ::winks at Erika::
Then I put dots of NYC polyester pink on the tips, and above I painted hearts. They may look like the same color, but they're not, the middle is red and the two sides are dark pink.
Finally, as gel nails are really popular here, I used a gel-look topcoat from Japanese brand Coffret D'or, mabe by Kanebo (though it's hard to see in the pic.)

To make my designs, I use a nail brush that I bought here for the equivalent of a whole dollar! Even better, the brush actually comes apart and snaps into itself, making it much more portable.
The lighting in the pic is casting some weird dark shadows on my fingers..0_0
photo-2
I'll be back again soon with beauty tips!